Friends in this article, I will explain to you, how can we make our studio soundproof and besides that, we’ll understand how sound travels. Because if we don’t know how the sound travels and what are reflections, we can’t understand how to absorb them and how to control them.
So I’ve divided this video into 3 sections. The first section is
In the second section, we’ll understand how to remove natural reverb, natural reflections or how to control them.
And in the third section, we’ll see the difference between soundproofing and acoustic treatment.
How Does Sound Travel
First of all if we understand how sound travels, then assume that this is your source. This can be your instrument, this can also be your vocalist. And for example, a microphone is placed just in front of it. Most of us feel that if a source tells something, sound comes out of the source, and that will directly do into the mic. So let me clear this for all of you, whenever we speak something or whenever you listen to an instrument, that doesn’t travel straight. Rather it scatters. So from this, we’ll get to know an important thing the vocal shields you see in the videos, and the vocal sheet you read about are totally invalid. That’s the reason they are not very effective.
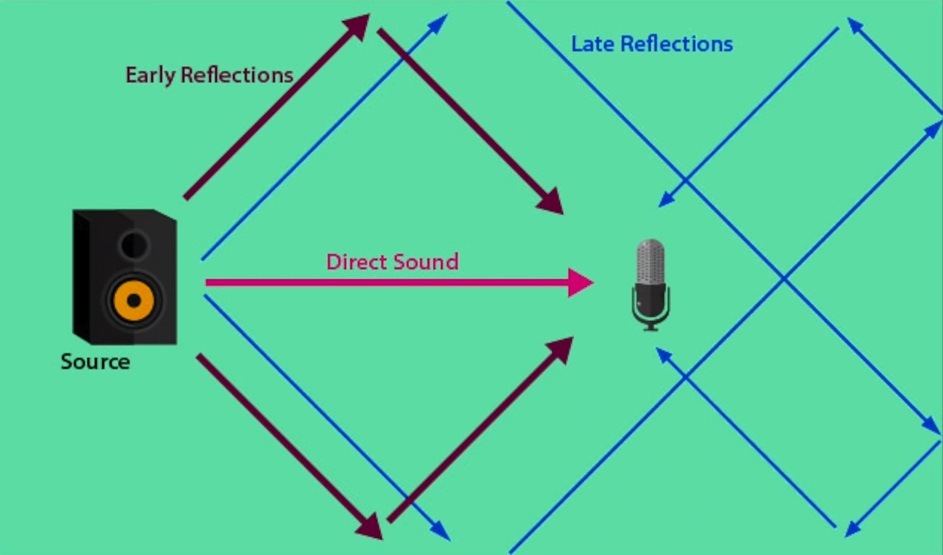
So this your source, the sound from the source which directly goes to the mic, we’ll call it direct sound. Which carry the texture whose frequency balance is very good and has a very good tone. But, the waves which get scattered, we call them reflected waves also. When they scatter and get back to the mic, because of which the frequency balance gets disturbed and due to this, the sound changes. And most of the times, your sound gets damaged. Why because, the untreated reflections, they get scattered in your room. waves get accumulated in a specific spot. They get trapped in a specific place, because of which, either some frequencies sound boosted or some frequencies may cancle out.
So to avoid this thing, we’ll treat our room. So before we proceed, I’ll tell you guys, how many types of reflections our room have.
We have 3 types of Reflections in Our Room
- Pure reflection
- Absorption
- Diffusion
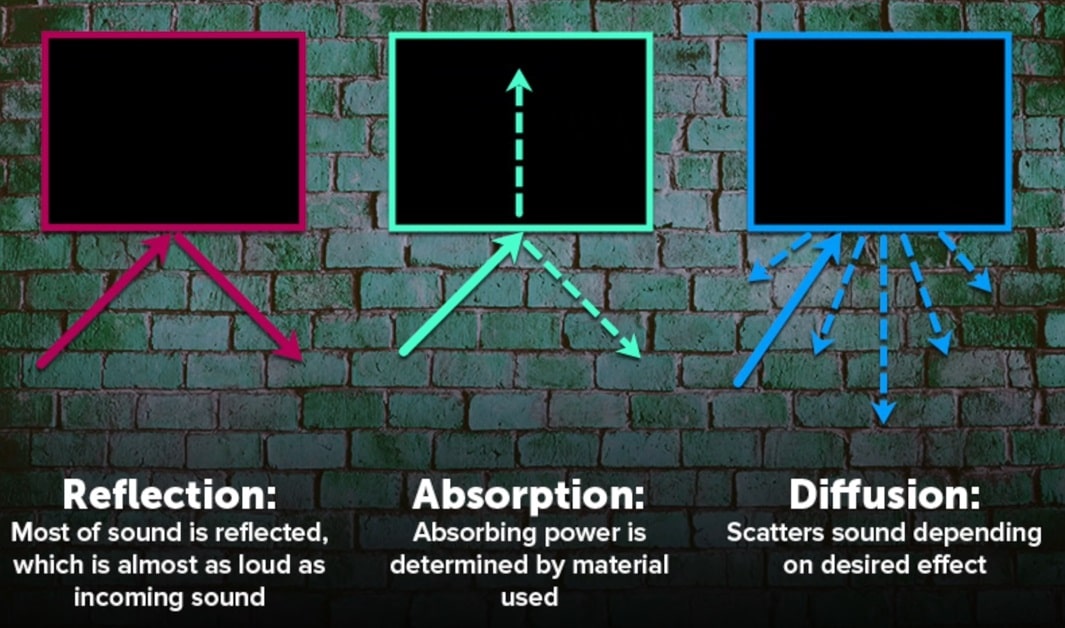
- So pure reflection is basically the original signal which you hear after a delay. Which means to hear the exact sound after a certain time interval.
- If we talk about absorption here, absorptions means that, if your sound wave hits something, the reflected wave doesn’t sound as loud as the original. Which means, some sound gets absorbed into that material. So this absorption, depends upon your material. What is the density of your material, and which type of material we are using. Besides this, the third type of reflection is diffusion.
- What is diffusion? Diffusion simply spreads the sound, scatters, doesn’t absorb. In the further sections, we’ll see what diffusion exactly is and what is its role in your room treatment.
So the 3 waves we talked about, 3 reflections we spoke about, combining these will make a perfect room for recording, mixing, mastering. Today we’ll understand the same thing, how can we design our room perfectly, make sure that our room’s frequency balance is quit good. So along with this we’ll talk about the second section, in which we’ll see how can we remove natural reverb from our room or to control it. So see, this can be achieved mainly with the help of 2 things. First thing is absorption. See, in absorption, it can be bass traps which absorb the low frequencies. It can be acoustic foam which mostly absorb mids and highs.
Glass wool and rock wool can also come which depends on their density, how much it can absorb. So our rock wool is a volcanic rock ‘dolomite’. It is made of this. If we talk about glass wool, glass wool is made of recycled glass, bottles, etc. But I’m pretty sure, this is not our science class. So who ever wants to study in detail about rock wool, glass wool, they can search in wikipedia. Along with this, if we talk about the second way, how can we control the reflections, then you can use diffusion. So diffusion means that, as I already told you, scattering of the sound. Because if you enable absorption in the whole room, if the reflected sound is absorbed completely in the room, then we call it a dead room. Because it is perfect neither for recording nor listening and it won’t be fun at all while working. So because of this reason, till some extent diffusion is needed and in next section, we’ll see exactly where and how to apply it. So lets talk about the third section. So see, first of all, this this has to be clear, whether you need a sound proofing or acoustic treatment. But before this, we should also know what this terms are.
What is Sound Proofing
Sound proofing means that you are isolating the sound of your room. Which means, sound from the room doesn’t go out and sound from the surroundings doesn’t enter the room. Where as acoustic treatment means that good sound is made in the room itself and make sure that reflections inside the room are controlled.
But it doesn’t guarantee that it stops the outdoor noice from entering the room and vice versa. In case if you feel, there is a lot sound entering the house from surroundings, lot of noise enters the studio then, you are in need of sound proofing. And if you feel sound isn’t an issue, you want your room to be good for mixing and recording, then you can go for acoustic treatment. Because of which your room will become fit for this process. So mainly for acoustic treatment, we need 3 things for big studios. Here I’ll also tell you, if you are working in a home studio, which things you’ll need and how to apply them.
- First of all, first thing is bass trap and I already told that bass traps mostly absorb your low frequencies and a little of mids too.
- Here the second thing is absorption panels. So absorptions always has to be used after the bass traps and the main thing is absorption panels kill the standing waves.
So standing waves means that, if you think that your room has two parallel surfaces, two identical walls facing each other, problem over there can be, there can be such waves which are reflected like this. Bouncing back from one surface to another. So to avoid that thing, acoustic panels are used. What they’ll do is, all the standings waves present, between the parallel surface, it will cancel them out.
Here, the third element, with which you can do acoustic treatment, they are diffusers. So important of all, we have to realise that, diffusers doesn’t cancel out our frequencies and diffusers just scatter the frequencies. So many of you must be thinking, what is the need of scattering the reflections.
So its simple reason is, I told you that the untreated reflections in our room, they get trapped in a specific place. Because of this, what happens is either it boosts a particular frequency or may cancel out a frequency. So to avoid that thing, we’ll use diffusers which scatter the sound, scatter the reflections. So it doesn’t get trapped in a specific place. Besides this, the good news for home studio users is, that you people don’t need diffusers because diffusers are mostly used in huge rooms, and large studios. Plus they are very costly too. So the application of diffusers mostly comes after placing bass traps and acoustic panels.
So if you guys watched this video till here, then there is a special bonus section for you in which I’ll tell you the exact approach, how treatment has to be started in your room, if you are recording in the house or even if you want to set up a professional studio. So as you can see, your room is like a cube. The red dot I made are known as Trihedral corners.
They are called trihedrals because you must be knowing tri means three. Where the three lines are meeting, three-axis are meeting, this can be put as three walls meeting at a point. First priority has to be given to this and make sure that you put bass traps over there. After that, as you can see, blue lines. We call these blue lines as Dihedral corners because the two walls meet over there as you can see in this figure. So for this you’ll give second priority and start applying your panels. And after this is your step three, comes the turn of diffusers.
So I already told you a lot about diffusers. So I just want to tell you that if you have large studios, if your room is quite huge, only then you’ll need diffusers because these are quite costly as well. Second thing, as far as I saw, diffusers in studios are used in ceilings and are less applied in the remaining places unless and until they are needed.
Besides this, I have read another interesting thing and that is, walls that are under your head level, make sure that acoustic panels are used over there because we have to make sure that reflections over there are permanently killed, absorbed completely, and not scattering or reflecting. Because, what happens is, whichever waves reflect under your head level, they will be heard first. So we need to make sure that fewer reflections are reaching the ears immediately so that the exact sound of your projector can be audible same as the exact sound. So that’s pretty much about it.